October 15, 2012

Lego table

My 4 year old LOVES Legos!! We are always building something new on his bedroom floor. I have learned the hard way that he doesn't always put them all away, so I bought this table at a thrift store for $3 and gave it a new coat of paint. 

Before


 Now he has a table to build on and be as creative as he wants and hopefully the Legos will stay off the floor.(don't mind the purple walls...we will be painting them in the near future.)

 After


Pin It

October 12, 2012

Coffee table turned bench

I found this coffee table on Pinterest and LOVED the detail. I didn't need a coffee table but had been wanting a bench for the end of my bed. 

Before


  So I took the knocker off the front and spray painted the table and the knocker grey.


   Then I took some foam and fabric and stapled it to a piece of plywood measured to fit the top of the table.


Finally, I screwed the fabric cover plywood to the top of the table and placed it at the end of my bed. I am so happy with how it came out! 

After


Pin It

September 22, 2012

Sweater-scarf and boot socks

I am always looking for new ways to dress up my wardrobe and when I saw boot socks on Pinterest I knew I had to try them. I started out with an old sweater and cut it at the armpits on both sides. Then I folded it down and added a button...simple as that.
Before


  As for the scarf I cut the sweater from the armpits down, stretched it out, and added a button.


 This whole redo took about 15 min and I LOVE my new accessories!

Pin It

September 15, 2012

Chair redo

I have been wanting to redo a chair for a few months now and when my favorite shop put everything half off I new it was time to find the perfect chair. Of course I found one and it was only $5 (thanks to the half off) 

Before


(close up of the fabric and the fabric under the floral one)


I found a gray chevron fabric and went with a pink spray paint. My husband trusted me enough to use the electric staple gun and I was able to complete this project without any help from him :) I LOVE it and can't wait to use it in a craft room one day!

After


Pin It

September 7, 2012

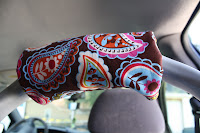
Seatbelt cover

Yesterday and today I tested out my sewing skills (which are slim to none) and impressed myself with what I was able to accomplish. I made 3 seat belt strap covers and 1 handle cover for my daughters car seat. They are very easy to make and very comfortable. This tutorial will make 1seat belt cover.

Supplies:

2 pieces of fabric 7.5"Lx 8.5"W 
1-2 pieces of 8x10 sewing batting (depending on how thick you want it)
scissors
sewing machine
Velcro

Step one:


Lay your fabric right side together, lay your piece of fleece on top and sew around the edges leaving a gap open to flip right-side out.

Step 2:

Once you have it turned right side out, add a piece of Velcro to the short side. Turn it over to the front side and place the other piece of Velcro about an inch in.  You can fold the fabric in thirds to see where your Velcro will match up. See pictures below


                 Front                                                                                                 Back


Other examples of seatbelt covers I made.


 Car seat handle cover (same steps as the seatbelt cover)


Pin It

August 19, 2012

Jewelry box redo

I found this jewelry box at my local thrift store for $4 and bought it to redo for my youngest daughter. 

Before


While getting it ready, I noticed that the necklace holder turned. When I turned it around there was, to my surprise, a ring holder with two rings in it!


I wanted it to be a bright fun color so I painted it yellow. I cleaned the design off the glass with a razor blade, taped it off, and began painting.While the paint was drying I covered the old ring holder, necklace holder, and drawers with new fabric. I LOVE how bright and colorful it is.

After


Pin It

Jewelry armoire redo

About 5 years ago my mom gave me this jewelry armoire as a Christmas gift. I LOVE the detail and the amount of space but over time I have wanted a different color...

Before


So I painted it!I LOVE the color and LOVE how easy it was.

After


Pin It

August 17, 2012

Dresser to TV stand

Since we bought this t.v center I have wanted one that stood a little higher. I liked the style and the simplicity of the our old one but it just seemed a little small.

Living room before


Recently, I started my search for ideas and found a ton; my favorite were dressers turned into t.v stands. So, I began my Craigslist search and found this amazing dresser. I love the details on the drawers, the handles, and especially the height!

 Before


I began prepping the dresser. I cleaned it up, removed the handles and primed it. While the dresser was drying I painted the handles black.


I am IN LOVE with the outcome!! I love the orange and the detail. This is one of my favorite pieces yet! :) 


After


Pin It

August 15, 2012

Salt n' Pepper

I found some wooden salt and peeper shakers for $3 and couldn't pass them up. I love how big and simple they are.

Before


I wiped them down, put tooth picks in the salt shaker holes, and painted them red to match my kitchen. I love them! :)

After


Pin It